 20% off carVertical*
 VIN check before buying: carVertical −20% discount
When buying a used car, you don’t want one with heavy accident history. Bodywork can be done so well that the car looks brand-new. The reliable way to know is to measure the paint with a thickness gauge. We use it every day across Germany (especially Berlin & Brandenburg) to give clients a transparent history. Listings often say “unfallfrei” (“accident-free”), but definitions vary: small repairs may “not count”, and less honest sellers omit crashes. Measuring the paint yourself or hiring experts is the most reliable path.
Why a paint thickness gauge matters
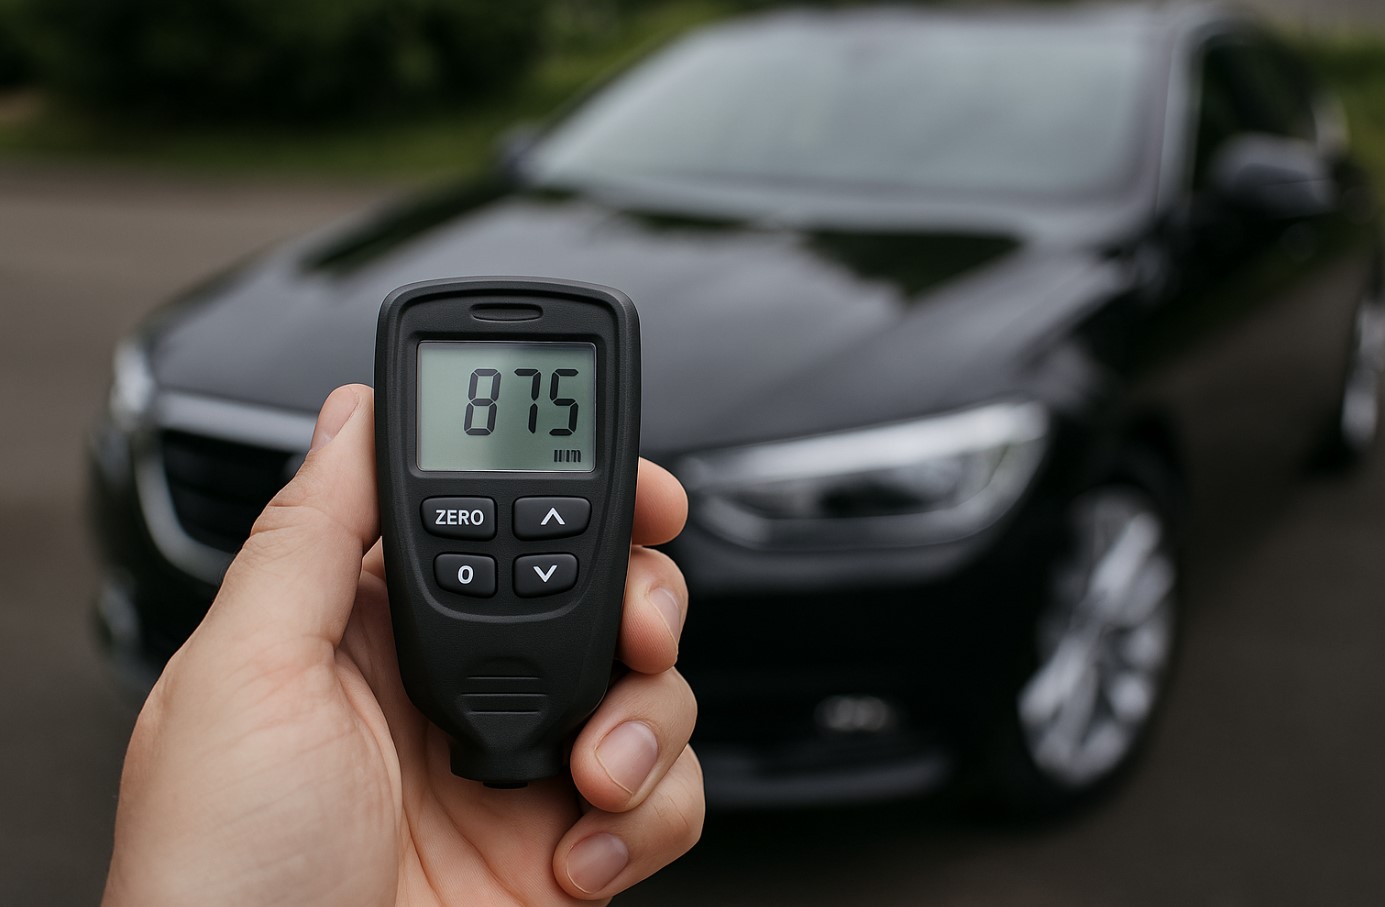
A paint gauge measures coating thickness. Types include magnetic (simple, imprecise), electromagnetic (more accurate; works on steel and aluminium) and ultrasonic (more expensive; can read on plastics). For car buying, a compact electromagnetic Fe/Al gauge is typically enough.
From factory, paint is even. Most cars show about 90–160 μm (local spots up to ~180–200 μm). Considerably higher numbers mean a respray; multiples often indicate body filler. A respray alone isn’t a deal-breaker (scratches, hail). But filler and a “layer cake” on structural elements are red flags—check geometry and history. ECU/airbag scans also help.
From practice: a flawless-looking car showed ~800 μm on the roof—thick filler under the paint. Later we learned it had rolled over.
Where and how to measure
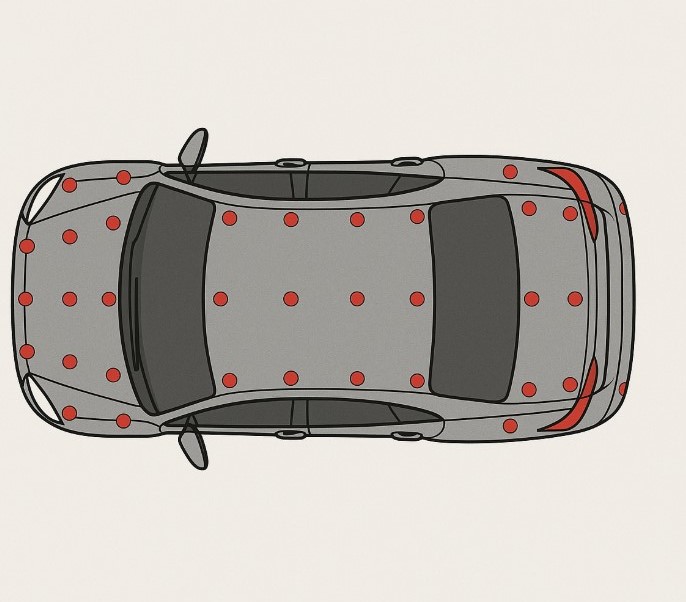
- Calibrate the gauge using the reference foils per the manual—otherwise readings won’t be trustworthy.
- Measure each panel at least in 5 spots (corners + center) and take 2–3 readings per spot—use the average.
- Probe perpendicular on a clean surface: tilt/dirt inflates numbers.
- Don’t skip the roof. Factory there is often 70–120 μm; outliers suggest hail/rollover.
- Check pillars and sills. Critical for safety—repairs here matter most.
- Materials. Aluminium is usually thinner; modern gauges show Fe/Al. If the bonnet “suddenly reads Fe” on an aluminium car—likely replaced.
- Plastics. EM gauges don’t read plastic; ultrasonic is required. Cosmetic plastic work is less critical.
Decoding the readings
- ~200+ μm: likely respray (incl. clear coat). Inspect closely.
- 300–500 μm: high chance of filler—repairs done. On structural parts, it’s a serious risk.
- 700–900 μm: very thick “layer cake”, used to correct major deformation. Future cracking/peeling possible.
- 1000+ μm: almost certain heavy crash damage. Best avoided.
Judge the whole car: a single local respray is a bargaining point; a “chain” of high values on adjacent panels (fender+door+pillar) hints at a major hit.
Other repair clues
- Colour/finish mismatch: tone, gloss, orange-peel, runs.
- Disassembly marks: chipped paint on wing bolts, door hinges, bonnet latch.
- Uneven gaps: asymmetry suggests pulled chassis.
- Glass & lights: year codes should match the car.
- Rails & floor: fresh seams/sealant, irregular corrosion—signs of repairs.
The gauge is a tool, not a verdict. An expert correlates readings with visual and legal checks to give a confident recommendation.
Buying a car in Germany? We’ll check bodywork and history for you
Our Sicher-Check team works in Berlin, Potsdam and across Germany. You get:
- 🔎 Document & history check (VIN reports, damage photos, mileage).
- 🧲 Paint measurements with a 5-point-per-panel method.
- 💻 OBD diagnostics, fault scan, test drive.
- 📝 A written “buy / don’t buy” verdict + bargaining arguments.
- 💬 English / German / Polish / Ukrainian.
- 💶 Transparent prices and a request form online.
Werbung / *Affiliate-Link
Links and banners marked with an asterisk (*) are affiliate links/banners. If you use such a link and subsequently request an offer, sign a contract or make a purchase, we receive a commission from the respective provider. For you, there are no disadvantages: the price and conditions remain the same.
Reference paint thickness: steel vs aluminium
Values are averages and depend on model/plant. Compare panels on the same car and look for “chains” of anomalies.
| Material | Panel | Factory thickness, μm | Acceptable variation | Be cautious if | Comment |
|---|---|---|---|---|---|
| Steel (Fe) | Fender/door/bonnet | 90–160 | up to ~180–200 | >220 — likely respray; >300 — filler |
Compare left/right sides and adjacent panels |
| Steel (Fe) | Roof | 70–120 | up to ~150–160 | >180 — hail/repair signs; >300 — filler |
Roof anomalies often point to rollover |
| Aluminium (Al) | Bonnet/fender/door | 60–110 | up to ~130–150 | >180 — respray; >280 — filler |
If the gauge reads “Fe” on an aluminium part — likely replaced |
| — | Plastic (bumpers etc.) | — | — | EM gauge won’t read | Ultrasonic required; plastic cosmetics are less critical |
Note: a single local respray = room to negotiate. A “chain” of high values (fender+door+pillar) = evidence of a major hit.
FAQ — frequently asked questions
Which paint gauge should I buy for pre-purchase checks?
An electromagnetic Fe/Al gauge covers most needs. If you must measure plastics, choose an ultrasonic gauge.
What’s a normal factory paint thickness?
Often 90–160 μm on steel with local spots up to ~180–200 μm. Aluminium is usually thinner. Readings of 300–500 μm suggest filler.
What if I see filler on pillars and sills?
It’s a marker of serious impact. We recommend a deeper geometry check; in most cases, walk away.
Related posts
VIN check before buying: carVertical −20% discount
 Choosing the best hybrids 2015–2025 on the German market