 5 signs a car might be a flood vehicle — how to avoid buying a flooded car
Buying a used car in Germany can look “safer” than in many other countries: cars often appear well maintained, service history may exist, and sellers can look professional. But in reality, cosmetics and nice photos can hide past repairs — and a “minor accident” may mean anything from a bumper swap to serious body work.
That’s exactly why paint thickness measurement is one of the quickest and most informative tools for an initial body check. It doesn’t deliver a verdict, but it helps you understand the history of individual panels: where it’s factory, where it’s repaint, and where filler is possible.
What you’ll learn in this guide
- ✔️ how to measure correctly so the readings actually mean something;
- ✔️ how to read microns: what is “normal”, and what is a true red flag;
- ✔️ realistic ranges across brands and why there is no single “factory number”;
- ✔️ what a thickness gauge will never show — and what you must inspect in parallel.
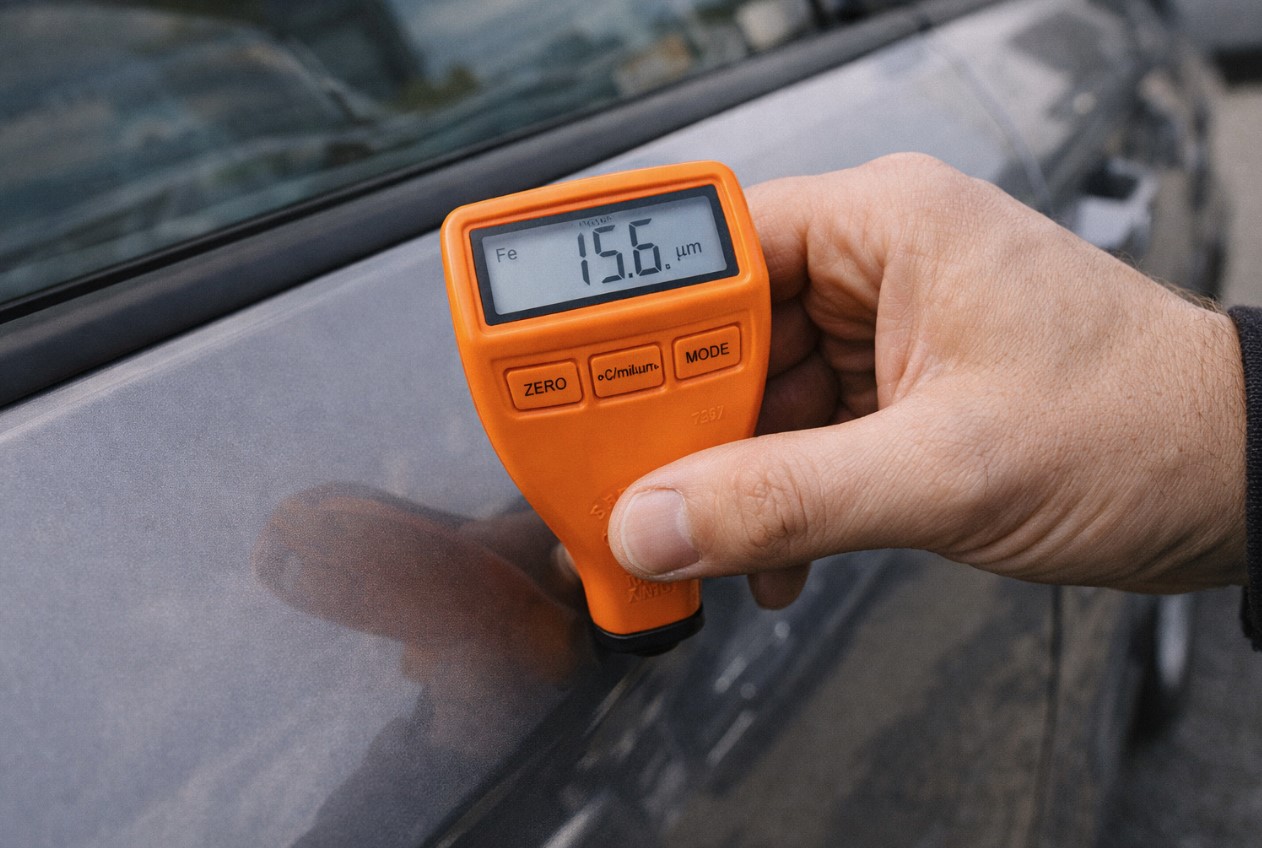
What does a paint thickness gauge really measure — and why does it matter?
Most automotive thickness gauges measure the total coating thickness on a metal panel: primer + base coat + clear coat — plus whatever was added later (repaint, extra layers, local repairs). The key point: the device cannot tell you which layer is thick. It only shows the “layer cake” total. That’s why a high number is a reason to investigate, not to panic or make instant conclusions.
Also important: classic magnetic/eddy-current gauges work on metal (steel/aluminium) but do not provide reliable readings on plastic (bumpers, trims). Modern cars have many plastic parts. If a seller says “the bumper is factory — measure it”, you simply won’t get a truthful picture with a standard gauge. Some non-metal parts require different methods (e.g., ultrasound), but those come with their own limitations.
Bottom line: a thickness gauge is a fast indicator, not a forensic tool. Its power is comparison and anomaly detection — not a “magic number”.
Why “factory paint” is not one number — and what to consider as a normal range
Factory paint processes are highly automated today (robots, controlled application, quality checks), but even factory paint has tolerances. Panel shape, vertical vs horizontal surfaces, edges and body geometry — all of this affects final thickness.
In real-world inspections, a practical “expanded factory corridor” is often roughly 80–160 µm (with caveats depending on model/panel). On vertical surfaces, thinner zones are common and can still be factory.
Repainting in a body shop usually includes more steps and layers, so total thickness often increases. In practice, many repaints show ~120–250 µm. If additional materials are used for levelling, the “stack” can go significantly higher — sometimes over 300 µm.
The right logic instead of “one number”
- Look for a pattern across the whole car: consistency, symmetry, and how panels relate to neighbours.
- Compare suspicious areas to panels that are likely untouched.
- Don’t only look at an average value — check the spread across a single panel (spots, steps, sharp jumps).
Correct measurement protocol: how to measure so the numbers have real meaning
Most paint measurement mistakes cause two problems: (1) you miss repairs because you measure “the wrong way” or “in the wrong places”; (2) you accuse a car of repairs when it’s actually factory tolerance, panel geometry, or your technique.
To make the measurement useful, follow a “body map” approach:
☝ Step 1. Prepare the measurement area
The surface should be relatively clean and dry. Thick dirt/salt/ice adds noise — and in Germany in winter, it’s a very common situation. A quick wipe with microfiber improves the accuracy.
☝ Step 2. Start with a reference panel
Practical tip: measure the roof first. It is less often damaged in accidents and gives you a good baseline for that specific vehicle. Then compare hood/fenders/doors.
☝ Step 3. Take series of points, not a single number
One reading on a door means nothing. Take 5–10 points: centre, near edges, upper/lower zones. The goal is to see uniformity. Repairs often show “spots” or sharp thickness differences.
☝ Step 4. Compare symmetry
Classic logic: left fender vs right fender, left door vs right door. Factory paint is usually relatively symmetrical, while local repairs often create asymmetry.
☝ Step 5. Record a “paint map”
Write it down (even in phone notes): panel → range → suspicious zones. This turns “a feeling” into an argument when speaking to the seller and negotiating price.
Mini checklist: what to bring to an inspection
- 📌 Paint thickness gauge (steel/aluminium), spare batteries
- 📌 Flashlight / headlamp
- 📌 Microfiber cloth
- 📌 Smartphone (notes + photos)
- 📌 Ideally: basic OBD scanner (even better — professional diagnostics)
How to read results: practical guides without self-deception
Online you’ll see “magic rules” like “up to 180 µm is factory, above is accident”. In reality, be careful: equipment, paint systems, brand habits, and panel geometry create variation.
Still, some practical guidelines help:
- ❗ Factory paint often falls around 80–150/160 µm (with model/panel differences).
- ❗ Around 200+ µm is often interpreted as likely repaint — then you validate visually and logically.
- ❗ 300+ µm is more often associated with heavier repair (extra layers, possible filler) — check gaps, fasteners, and geometry carefully.
Thickness alone does not mean “good/bad”. A quality repaint after minor damage may be cosmetic. But a beautifully painted surface can hide impact damage, corrosion, or incorrect geometry restoration. That’s why readings must be confirmed visually and with history checks.
Common scenarios: calm interpretation
| Scenario | Typical gauge pattern | What to check additionally |
|---|---|---|
| Cosmetic repaint (chips/scratches) | Moderate increase, fairly uniform across the panel | Edge quality, tone/orange peel, invoices or proof of repair |
| Repair after impact (partial) | Point-to-point jumps, left/right asymmetry, “spots” | Body gaps, bolts/fasteners, structural areas, headlight brackets |
| Hidden filler | Very high values (often 300+), “steps” across the panel | Welding/straightening traces, geometry, corrosion under repair, accident history |
Factory paint by brand: realistic ranges and how to use them
честно: manufacturers rarely publish official “paint thickness specs” for buyers, and real readings depend on model, plant, year, paint type, and the exact panel. Therefore, brand tables are usually empirical — not official specifications.
But as an inspection guide they are useful — if you apply them correctly: a table is a hint about the “order of magnitude”, not proof.
| Brand / group | Typical “often seen” range (µm) | How to use it when buying |
|---|---|---|
| Audi | ~114–147 (on many models) | If you see 220–300 on one fender — check for repaint/repair. |
| BMW | Wide corridors exist (often ~70–160 depending on model) | Use a “car map”: compare left/right and use the roof as a reference. |
| Volkswagen | Commonly ~70–150 | Some variation is normal, but a 2× jump on one panel is rarely factory. |
| General reference | Often quoted 80–130/140 or 90–120 as typical industrial ranges | Good for understanding scale, but never replace comparisons across the car. |
Practical rule: don’t search for a “perfect number”. Search for anomalies: “one panel twice as thick”, “thick spot in the middle of a door”, “one side differs strongly from the other”.
Where a thickness gauge is most useful — and where it can mislead
Most useful on
- 📌 doors/fenders/hood/trunk lid — panels often repaired locally after minor impacts;
- 📌 pillars and structural areas (A/B/C) — high thickness here is more concerning because it may indicate serious post-impact work.
Can be misleading on
- 👓 plastic parts (standard gauges won’t measure correctly);
- 👓 areas with factory anti-gravel / protective coatings;
- 👓 edges/ribs where geometry affects readings.
Repair traces you should check together with paint thickness
To avoid turning a gauge into “fortune telling”, always verify visually and logically:
- 💡 Overspray on rubbers, plastics, inner edges (door jambs, trunk openings).
- 💡 Orange peel and colour tone: even a good repaint may differ in texture/reflection.
- 💡 Bolts and fasteners: tool marks on fenders/hood, damaged paint around bolts.
- 💡 Body gaps: uneven gaps, shifted doors/hood/trunk.
- 💡 Glass dates (markings) and headlights: replacement can be normal, but may also indicate an accident — check in context.
- 💡 SRS/airbag errors: sometimes a “perfect body” hides a past airbag event — diagnostics matter.
Why “paint + diagnostics” makes the check stronger
If paint readings raise questions (especially around pillars/front end), it’s smart to add computer diagnostics: SRS/airbag faults, stored records, resets and indirect indicators can provide a fuller picture.
When it’s better to stop guessing and invite an expert
If you’re buying in Berlin or anywhere in Germany, remember: good listings can be sold within a day, and you may not have time for a “perfect DIY inspection”. In practice, bringing an expert helps when:
- 🔥 readings are inconsistent and you’re unsure what they mean;
- 🔥 the seller avoids answers (“don’t know”, “was like that”, “nothing painted”) despite clear anomalies;
- 🔥 the car is expensive/complex (premium, hybrid/EV, advanced driver assistance) and a mistake costs a lot;
- 🔥 you buy remotely and need a written report with photo/video and a clear “buy / don’t buy” conclusion.
A professional pre-purchase inspection usually combines paint measurement, OBD diagnostics, test drive, history check and documents — that’s what really protects a buyer.
Werbung / *Affiliate-Link
Links and banners marked with an asterisk (*) are affiliate links/banners. If you use such a link and subsequently request an offer, sign a contract or make a purchase, we receive a commission from the respective provider. For you, there are no disadvantages: the price and conditions remain the same.
FAQ — paint thickness gauge questions
Is there an “ideal” factory thickness number?
No. Factory paint has tolerances; panels differ by geometry, and different plants/years/paint systems vary. What matters is the pattern across the car: roof as a reference + left/right symmetry + uniformity on each panel.
Should I treat 200+ µm as a stop sign?
It’s a reason to check deeper: often it indicates repainting, but quality can be good or bad. Inspect edges, tone/orange peel, fasteners, body gaps and any proof of repair. For expensive cars — expert evaluation is the safest approach.
Why doesn’t a thickness gauge “see everything”?
It measures total coating thickness on metal, but it does not show body geometry, repair quality, corrosion under filler, and it often doesn’t work on plastic parts. Always combine readings with visual inspection and history checks.
Is paint thickness measurement connected to flood-car checks?
Indirectly, yes: flood cars are often cosmetically refreshed and parts may be replaced. But the key flood signs are interior/electrics/corrosion on connectors and diagnostic scan of modules.
Related posts
5 signs a car might be a flood vehicle — how to avoid buying a flooded car
 OBD diagnostics: how it works and what it can miss